Wednesday, August 21, 2013

Paleo Chocolate Chip Cookies

My friend recommended that I make these Paleo chocolate chip cookies. She said they were the best chocolate chips cookies she has ever had. We went to the Tucker Farmers Market the other week and when we found almond flour I knew I had to bake the cookies. Next step was tracking down coconut oil so I located some by LouAna at Wal-Mart. Yes, I said Wal-Mart...I know, I know. I rarely shop there okay?!? Then Ghiradelli was on sale at Target so I picked up a bar of the Sea Salt Soiree...woo hoo! I have been on a Farmers Market kick this summer and purchased local honey at the Statham Farmers Market a few weeks ago so I went with that for this recipe.

 
The batter is very interesting. I did not know what to expect since this was my first time baking with almond flour. It smells delicious! I let my parents and a friend try these cookies. None of us like them. My dad went as far to say I wasted perfectly good chocolate. I assured him it was only a quarter cup so no big waste. I said I may take them in to work to share with my coworkers and mom said "You better not. You will mess up your baking reputation." A Southern girl never wants to tarnish her baking reputation..lol. You may ask why I decided to share this recipe if it was a total fail. Well, I decided we all have different tastes and someone, like my girlfriend, might enjoy them. At least I do not feel too guilty eating them. Oh and of course no one wanted any cookies to take home so yeah I get to eat the rest. To end on a positive note I purchased Maple Caramel Almond Butter from NaturAlmond at the Farmers Market and it is AMAZING!!! I may track down a recipe to bake something with the almond butter. Then again I may be selfish and enjoy it all by myself!


Paleo Chocolate Chip Cookies 

Prep time
 
Cook time

Total time

Dairy, gluten and grain free chocolate chunk cookies that taste just like the real deal.
Author:
Recipe type: cookies
Serves: 10 cookies

Ingredients
  • 1 cup almond meal
  • ⅛ teaspoon salt
  • ⅛ teaspoon baking soda
  • 3 tablespoons melted coconut oil (*update: make sure to measure oil after melting so that you’re not inadvertently using too much. This can cause cookies to flatten)
  • 2 tablespoons honey
  • 1 teaspoon vanilla extract
  • 1 tablespoon almond milk
  • ¼ cup chopped dark chocolate pieces
 
Instructions
  1. Preheat oven to 350 degrees and line a baking sheet with parchment paper or a silpat.
  2. Combine dry ingredients in a medium bowl.
  3. Whisk together wet ingredients in a small bowl.
  4. Add wet to dry and mix together.
  5. Fill a tablespoon measure with batter and press down to form a half-circle. Tap batter out onto baking sheet and lightly press down in the center.
  6. Bake for 10-11 minutes until bottoms just start to turn brown.
  7. Remove from oven and let cool 2-3 minutes before transferring to a wire rack. They will be soft when removed from oven but firm up in a couple of minutes.


Spiced Peach Muffins

This may be hard for ya'll to believe but this is the first year that I've been crazy about peaches. I was born and raised in Georgia so I know it is shocking. It started last year after I had a Monte Cristo sandwich with peach jelly at Duck's Cosmic Kitchen with a side of some amazing peach salad concoction. Then this year my mom made her 2nd annual blueberry-peach galette. Yum! A couple of weeks ago I bought some peaches at the Tucker Farmers Market and enjoyed eating them all by themselves. Georgia peaches are so sweet and juicy! Apparently the trick to getting them soft is to leave them in a paper bag on the counter. Wow I learn something new everyday. Any who, I came across this muffin recipe and decided to bake it up.

 
The muffin is a little taste of summer with a dash of fall. I did not have allspice so I substituted pumpkin pie spice. Some of you may find this strange but I love pumpkins so I was pleased with the outcome. I will suggest that you use the biggest mixing bowl you own because it is a lot of batter and a mound of peaches. Also, I was able to get 23 muffins. I had too much for 16 muffins and not enough for 24 heaping muffins. Always a bummer when that happens. So some are small and some are gigantic. Nothing wrong with that I guess.


Spiced Peach Muffins

Makes 16 muffins.

4 1/2 cups Unbleached All-Purpose Flour
1 teaspoon salt
4 1/2 teaspoons baking powder
2 cups dark brown sugar
1/2 teaspoon ground allspice
1/2 teaspoon ground nutmeg
1 teaspoon ground cinnamon
2 eggs
3/4 cup vegetable oil
1 1/4 cups milk
4 peaches, diced (not peeled)
granulated sugar

1. Preheat oven to 400ºF. Grease a 16 cup muffin tin, set aside.

2. In a large bowl combine flour, salt, baking powder, brown sugar, allspice, nutmeg and cinnamon. Stir in eggs, vegetable oil and milk, then gently stir in fruit.

3. Heap the batter into cups; they’ll be very full. Sprinkle with granulated sugar. Bake for 25 to 30 minutes, or until muffins test done.

Tuesday, July 30, 2013

Biscones

Last fall during a trip to Savannah, GA I checked out Back in the Day bakery. I learned about this bakery and one of owners, Cheryl Day, while watching a couple of episodes of Paula Deen on the food network. Before leaving I read up on the bakery and knew I had to go. My mom and I loved it! The cupcakes were to die for and the bakery had this adorable vintage motif. Of course we bought the cookbook! Mom has made the old fashioned cupcakes a few times. In an effort to bake with blueberries I decided to try out the biscones. At first I was not quite sure what a biscone is but I know I like biscuits and scones so why not combine them???

 
It is a one bowl recipe that could not be easier. Then you just scoop them on a baking sheet lined with parchment paper - no rolling - no shaping!!! I baked them for 23 minutes which was too long because some of the bottoms browned. When I checked them though at 20 minutes they still looked gooey. Nope, apparently that is  the texture because they looked the same 3 minutes later.  Not quite golden brown like the recipe says but fully baked. Baking times will vary so word to the wise do not expect the biscones to be as dry as a biscuit nor a scone.

The cookbook gives you the option to make buttermilk biscones or add blueberries and whip up a lemon glaze. Blueberries and lemon please! There is probably half a gallon still in my freezer from picking earlier this month. It takes a couple of bites before your brain can process what you are eating. I had a hard time placing the yummy sweet taste. The recipe calls for cardamom but I opted to substitute with equal parts cinnamon and nutmeg. I think this may have been the sweet deliciousness. My dad liked these which is saying a lot because he is not big on some pastries...umm like scones.


Ingredients

 
1 1/2 cups unbleached all-purpose flour

1 1/2 cups cake flour (not self-rising)

1/4 cup granulated sugar

2 tablespoons baking powder

Salt

1/4 teaspoon ground cardamom

1/2 pound (2 sticks) cold unsalted butter, cut into 1/2-inch pieces

1/2 cup fresh or frozen blueberries

1 1/2 cups buttermilk, plus more as needed

1 large egg

3/4 cup confectioners' sugar

Zest and juice of 1 lemon
 

Directions

 
1. Preheat the oven to 375° and line two baking sheets with parchment paper.

2. In a large mixing bowl, whisk the all-purpose flour with the cake flour, granulated sugar, baking powder, 3/4 teaspoon of the salt and cardamom until combined. Using a pastry cutter or two knives, work in the butter until you have various-size pieces ranging from sandy patches to pea-size chunks and some larger bits as well. Gently stir in the blueberries.

3. Gradually pour in the buttermilk and gently fold the mixture until there are no bits of flour remaining in the bottom of the bowl. If the dough seems dry, add a little more buttermilk until it is moist and slightly sticky.

4. Using your hands, gently pat down the dough until it resembles a loaf of bread. Using a large ice-cream scoop, scoop mounds of the dough onto the prepared baking sheets, arranging them about 1 inch apart. Lightly tap down the tops of the biscones with the scoop.

5. In a small bowl, lightly beat the egg with a pinch of salt. Brush the tops of the biscones liberally with the egg wash. Bake for 20 to 25 minutes, rotating the baking sheets halfway through, until the biscones are golden and fully baked. Remove from the oven and let cool for 10 minutes.

6. Meanwhile, in a small bowl, whisk the confectioners' sugar with the grated lemon zest and juice until smooth and creamy. Drizzle over the biscones and serve immediately.
 

Put some SOUTH in your mouth y'all!!!!!!


Wednesday, July 17, 2013

Roasted Blueberry Cupcakes


Happy National Blueberry Month!!! (Now you all know that July is National blueberry month..in case you did't already.) I picked blueberries at Washington Farms over the July 4th weekend. Not quite sure why my mom and I enjoy this so much but we do. This year we decided to go early in the morning so we would have a chance to pick blackberries too. It was my first time picking blackberries and man was it fun. I'm undecided about baking anything with blackberries. Right now I'm loving them with yogurt, granola, and some honey.


Back to the blueberries and recipe at hand. These recipes on the Bean Town Baker blog popped up before I went blueberry picking and I made a mental note that I had to see these beautifully purple cupcakes for myself. Wow! The color is amazing!

I was a little apprehensive about roasting blueberries in fear that my oven would be a mess. I placed the cute little guys on some aluminum foil and it was an easy clean up. Easy as in crinkle up the foil and throw it away! No harm done to the cookie sheet or oven. It was lots of fun watching the creamy batter turn purple. Now I will say that the bottom of my cupcake wells are slightly purple. I baked the cupcakes in purple liners but I have used these Wilton liners before in red with no problem. Still scratching my head on this one. My attempt at this recipe yielded 15 cupcakes. I'm sure I could have produced one more..oh well.


The only change I made to the recipe was that I substituted almond extract for vanilla. Totally forgot to pick up vanilla extract at the grocery store. Whoops!

This cream cheese frosting recipe is to die for! Very sweet!!! (And it was enough to frost all 15 cupcakes with a little extra left for sampling.) My friend asked if there was extra frosting because she wanted to eat the frosting by itself. Silly girl...no leftovers...I took care of that. The girls in my small group noted that the cupcake is heavy and cake like. I agree with them that the consistency is like no other cupcake I have baked before. Must be that roasted blueberry goodness. Only had a few takers during small group so I brought the rest in to work. A coworker e-mailed me to say the cupcake is delicious. This made me think of Julia Child, "It's delicious!" On that note, do not feel like you have to go all out and pick fresh blueberries. Store bought berries will be just fine and then you too can watch the magical transformation into PURPLE batter and cupcakes.

Roasted Blueberry Cupcakes with Cream Cheese Frosting

Roasted blueberries have a strong sweet flavor that comes through perfectly in these cupcakes
Yield: 16 cupcakes

Ingredients:

1 1/2 cups fresh blueberries
1 cup sugar
1/2 cup butter
2 eggs
2 tsp vanilla
1 3/4 cups flour
1 1/4 tsp baking powder
1/4 tsp salt
2-3 Tbsp milk
1 batch Cream Cheese Frosting

Directions:

Preheat oven to 350 degrees F.
Spread blueberries on a baking sheet (with sides) and roast for 10-15 minutes, or until berries start to burst. Remove from oven and let cool.
Beat butter and sugar together in the bowl of an electric mixer until fluffy, about 4-5 minutes.
Add eggs and vanilla and mix until combined, another 2-3 minutes.
Add flour, baking powder and salt with the mixer on low speed, then gradually increase speed.
Scrape in blueberries and beat on medium speed until the berries break down – about 2-3 minutes. At this point, the berries most likely have enough liquid that you only need to add a small amount of milk to the batter.
Begin adding 1 tablespoon of milk at a time and beat with the mixer until the batter is smooth. You definitely want it to be cake batter and not dough. (My batter took 2 Tbsp of milk)
Pour into cupcake liners, filling 2/3 of the way full, and bake for 18-22 minutes or until cake is set. Let cool completely, then frost.
 

Cream Cheese Frosting

Yield: 1 cup (enough to frost 12 cupcakes)

Ingredients:

4 oz cream cheese at room temp
1/2 stick (4 Tbsp) butter at room temp
1/2 Tbsp vanilla
1 1/2-2 cups powdered sugar

Directions:

Place the cream cheese in the bowl of your mixer. Beat on medium-high until completely smooth, 3-4 minutes. Add the butter and continue to cream until fluffy.
Add vanilla extract. Slowly add powdered sugar (1/4 cup at a time) until desired consistency is reached.


Monday, July 8, 2013

Tie Dye Cake


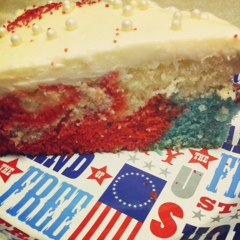
When contemplating what to make for July 4th I came across this tie dye cake. All the berry desserts are great but I LOVE cake! The cake was simple to make and it tasted very sweet!

It was a joint colaboration with my mom. She mixed up the cake and dyed part of the batter red. I dyed another portion of the batter blue, mixed up the icing, and decorated the cake with white sugar pearls and red sugar. Always more fun when you have someone to bake with. We considered slicing the cake in half as Sally of Sally's Baking Addiction offered as a suggestion. I mean who in my family refuses more frosting?!? The cake started to crack a little in the middle while cooling (we may have taken it out of the pan too soon - we are eager eaters). Thus we went with the single layer and boy were we glad. The frosting is sooooo rich! My mom has added this recipe to her official cake line up. Anyone else have a cake line up or a few go to recipes? We also love Back in the Day's recipe.


I hope everyone had a fabulous 4th of July! We did despite the rain. Cake makes everything better. You should consider making this for your next festive get together or even plain ole' vanilla will be just wonderful!
 
How to Make a Tie-Dye Cake
Serves 10. Cake stays fresh covered at room temperature or in the refrigerator for 5 days.
 
Ingredients
Instructions
  1. Preheat oven to 350F degrees. Spray 9x2 inch round cake pan (or 9-inch springform pan) with nonstick spray.
  2. Make the cake batter according to my directions (see link in the ingredient list). Divide the white batter into three separate bowls. Grab your food coloring and dye your batters any color you choose. I used 10 drops of red, 10 drops of blue, and left the third bowl plain. Place a separate spoon in each bowl. Scoop large spoonfuls of each batter and layer them into prepared baking pan. It does not have to be pretty. The colors will create a tie-dye effect. See photo above for how my cake looked prior to baking.
  3. Bake for 20 minutes. Cover loosely with aluminum foil (loosely to avoid the top from sticking to the foil). Bake for 13-17 more minutes or until a toothpick inserted in the center comes out clean. Allow to cool.
  4. Make the frosting according to my directions (see link for frosting in ingredient list). Frost cooled cake and decorate as desired.
Notes
Interested in making a layer cake? You could: (1) Bake the cake as indicated and slice the cake horizontally to create two layers. Double the frosting if desired. (2) Double the cake recipe and bake in two separate 9-inch cake pans for 1 extra tall layer cake. Double the frosting recipe as well.


Wednesday, June 12, 2013

Dark Chocolate Cupcakes with Mascarpone Frosting

It has been a long time since I've posted a cupcake recipe...so sorry. Of course I made cupcakes for Mother's Day...amaretto actually..but I failed to take a picture.

I had half a container of mascarpone cheese that needed a home and I stumbled upon a new blog....well new to me..a cup of mascarpone. Such a cute name for a blog! May be a bit biased because I love mascarpone. The recipe calls for special dark cocoa and I was not too sure I had seen this in the grocery store. I asked my mom and she said "Oh that is right next to the regular cocoa." Of course mom always knows these things. Sure enough "regular" cocoa was sitting beside the special dark cocoa. I guess they are supermarket buddies...haha.


If you are a one bowl baker, then this recipe is for you. It could not have been easier. Dump all the ingredients into the mixer and let that bad boy (Kitchen Aid mixer) do it's thing. Special dark cocoa really makes for a beautiful dark chocolate color. I'm regretting not snapping a picture. Carol was right, the batter is very thin. I still used an ice cream scoop and was prepared for a mess.

A while back I purchased white cupcake liners by Wilton and I will not do that again. The liners are too big for my cupcake pan so they fold and then there are creases in the cupcakes. Also, it makes it hard to tell how much batter is in the well so some cupcakes came out too big. Does anyone ever really complain about a cupcake that is too big? I mean really that is just more room for icing, right?

The mascarpone frosting with more special dark cocoa is to die for....okay dramatic. I mean butter and mascarpone in one bowl....oh yeah! For some reason my frosting has a different color than Carol's and the consistency does not look as smooth. Oh well it still tastes wonderful and was approved by my small group and coworkers.

I like how Carol ends her blog posts...Mangia! xox...adorable. So with that Mangia!

 
Dark Chocolate Cupcakes with Chocolate Mascarpone Buttercream
                       Makes approximately 30 cupcakes
Ingredients:
 
for the cupcakes:
2 cups sugar
1-3/4 cups all-purpose flour
3/4 cup Hershey's "Special Dark" Cocoa
1-1/2 teaspoons baking powder
1-1/2 teaspoons baking soda
1 teaspoon salt
2 eggs
1 cup milk
1/2 cup canola oil
2 teaspoons vanilla extract
1 cup boiling water or 1 cup hot brewed coffee
for the mascarpone buttercream:
4 ounces (1/2 of an 8 ounce tub) mascarpone cheese
1/2 cup butter, softened
1/3 cup Hershey's "Special Dark" Cocoa
2 tablespoons milk
2 teaspoons vanilla
1 16 ounce box powdered sugar, sifted
 
Create the cupcakes and buttercream:
 
make the cupcakes:
Heat oven to 350 degrees F. Line muffin pans (2-1/2" in diameter) with paper baking cups. Set aside.
 
Stir together sugar, flour, cocoa, baking powder, baking soda and salt in large bowl. Add eggs, milk, oil and vanilla; beat on medium speed of hand mixer for 2 minutes. Stir in boiling water or hot coffee (batter will be thin).
Fill cups 2/3 full with batter. Bake 22 - 25 minutes. Place on wire racks and remove from the pans as soon as they're able to be touched without burning yourself. Cool completely on wire racks before frosting. (I only bake one pan at a time and turn the pan half way through the baking cycle.)
make the mascarpone buttercream:
In a large mixing bowl, beat the mascarpone cheese, butter, cocoa powder, milk and vanilla with an electric stand mixer on medium to high speed until creamy. Gradually add powdered sugar, beating until smooth. Beat in enough additional milk (only if needed), 1 teaspoon at a time, to reach consistency needed for cupcakes. Makes 3 cups.

Monday, April 8, 2013

Triple Chocolate Chunk Muffins

I located a low calorie chocolate muffin recipe on the Six Sister's Stuff blog and had to give it a try. The instructions include using a blender or food processor in order to grind up the oats. My first thought was this is odd but I went with it. Blending up some muffins is fun! I went off course a bit and kept the batter in the blender and stirred in the chocolate chips. Much easier to pour the batter in the cupcake wells instead of scooping! Oh and I used regular sugar instead of Stevia so my muffins are not 58 calories. Oh well. They have that healthy made with applesauce and yogurt so I zap them in the microwave for 15 seconds and they taste sinful. Recently I tried almond milk for the first time and I would say these muffins and almond milk are a nice pairing.


Blend away baby!