Wednesday, August 13, 2014

Guilt-Free Blueberry muffins

Annually I make a trip to Washington Farms in Watkinsville, GA and pick blueberries with my mother. It is such a gratifying experience to pick your own fruit and then store it up in the freezer for endless possibilities later. I decided to mix up my blueberry muffin routine and discovered a so called guilt free recipe on the Kitchen Meets Girl blog. Not so sure about struesel topping being guilt free but I guess the use of yogurt and skim milk balances it out. Of course I used 1% milk instead of skim so basically this is pure indulgence. It seems my struesel did not come out like Ashley's, based on her pictures. It still tastes good though!


Guilt-Free Blueberry Muffins

makes 12 muffins
 
Ingredients
  • 2 cups all purpose flour
  • 1/2 tsp baking soda
  • 1 tsp baking powder
  • 1/2 tsp table salt
  • 1 teaspoon cinnamon
  • 1 large egg
  • 3/4 cup sugar, divided
  • 3/4 cup Greek blueberry yogurt (I used Chobani)
  • 1 teaspoon vanilla extract
  • 1/4 cup fat free skim milk, divided
  • 1 1/2 cups fresh blueberries, washed
  • For the struesel:
  • 1/4 cup flour
  • 1/4 cup sugar
  • 1/2 teaspoon cinnamon
  • 2 tablespoons unsalted butter, melted
 
Instructions
  1. Preheat oven to 425ºF. Place muffin liners in a 12-hole muffin pan.
  2. In a large bowl, combine 2 cups of flour, baking soda, baking powder, cinnamon and salt; set aside.
  3. In the bowl of an electric mixer, beat egg with 3/4 cup of sugar until light and fluffy. Add yogurt and beat until thoroughly combined; blend in vanilla extract.
  4. Add half of flour mixture and half of milk to sugar mixture; beat until just combined. Add remaining flour mixture and milk; beat until smooth.
  5. Fold in blueberries and fill each muffin liner about 3/4 full.
  6. To make streusel topping:
  7. Combine remaining 1/4 cup each of sugar and flour in a small bowl. Pour in melted butter and combine with fingertips. Divide crumb mixture over muffins; gently press into top of muffin batter with fingertips.
  8. Bake for 5 minutes at 425, then reduce your oven temperature to 325. Bake for an additional 12 to 15 minutes, or until slightly golden and a toothpick inserted in center of a muffin comes out clean. Cool in pans for about 10 to 15 minutes and then transfer muffins onto racks to cool completely.

Tuesday, June 24, 2014

Polenta French Toast

I have been saving this recipe for awhile...waiting for the right moment. The stars had to align perfectly, ya know? Anyway I was making a big ole pot of polenta and realized there was no way I was eating that much Italian polenta with the Creole Chicken and Sausage I made in the slow cooker. I remembered I wanted to try Breakfast Polenta and specifically use the tip at the end of the Take a Megabite blog post. Ms. Megabite is right, this is like French Toast's cousin. I sliced my pieces big like I would French bread so it took a bit of time to brown up in the pan. May not be photo friendly but then again I snapped a quick picture as I was digging in...just returned from the gym. This is delicious stuff and the polenta flavor barely comes through with all that cinnamon, brown sugar, and vanilla goodness.


Vanilla Brown Sugar Breakfast Polenta

{Serves 3-4}
Recipe adapted in half from Joy the Baker
Ingredients:
  • 1/2 cup polenta
  • 1 1/2 cups water
  • 1 cup milk
  • heaping 1/4 t salt
  • 2 heaping T brown sugar
  • 1/2 t vanilla
  • pinch of cinnamon
Directions:
  1. Measure out the polenta in a small bowl and top with 1/2 cup cold water. Put remaining cup of water and milk in a saucepan and bring to a low boil. Add salt and stir. Slowly add polenta mixture, whisking away lumps.
  2. Once all of the polenta is added, turn the heat to low, and simmer until thickened. When it’s the thickness you fancy, stir in the brown sugar, vanilla, and cinnamon. Remove from heat and serve in a small bowl or cup topped with a little bit of milk and some additional brown sugar if you want. Enjoy!
TIP: Pour the leftover polenta into a plastic wrap lined loaf pan and chill until firm. Then slice, dredge in flour, and toss in a frying pan with some hot vegetable oil. Top it with jam or syrup and enjoy! It’s like French toast’s cousin!


Okay, so this blog is mainly cupcakes and other baked goods but I just have to share this Slow Cooker Creole Chicken and Sausage with ya'll too. I served mine up with polenta instead of rice.

Slow Cooker Creole Chicken and Sausage

Author:
 
Serves: 6
 
Ingredients
The essentials:
  • 1 pound boneless skinless chicken breasts
  • 12 ounces smoked Andouille sausage, cut into small rounds
  • 1 cup chopped onions
  • 2 cloves minced garlic
  • 1¼ cup low sodium chicken broth
  • 1 can (14.5 ounces) diced tomatoes
  • 3 tablespoons tomato paste
  • ½ cup tomato sauce
  • 2 teaspoons Creole seasoning
  • ¼ teaspoon cayenne
Optional extras:
  • 1 tablespoon brown sugar
  • 1 14 ounce can black beans, rinsed and drained
  • 2 green bell peppers, chopped
  • ½ cup sliced green onions for topping
  • 2 tablespoons almond butter (randomly delicious)
  • salt to taste
  • brown rice for serving

Instructions
  1. Place the essential ingredients in the crockpot. Cover and cook on low for 6-8 hours or high for 3 hours.
  2. Shred the chicken directly in the crockpot to your desired texture. Add the extras, if you want, and cover and cook for another 20-30 minutes. This is also a great time to make your rice, if you're serving it with rice. When everything is ready, taste the chicken mixture and season with salt. Serve the creole chicken over rice and topped with green onions.

Monday, June 16, 2014

Lemon Blueberry Layer Cake

Well another Father's Day has gone by. I do not know about your dad, but mine loves cake. I showed him the Lemon Blueberry Layer Cake on Sally's Baking Addiction and his eyes lit up like a five year old on Christmas morning. I knew with that response that this cake would be a good one for Father's Day. He is not a big fan of blueberries. However, my mom and I are berry addicts so he obliged since it is a three layer cake. This was my first three layer cake and I was up for the challenge. My mom later admitted that she knew I could do it but was not sure the cake would "cooperate". Apparently my mom has a history of cake mishaps. As a kid I remember her struggling with caramel frosting (my dad's favorite).


I followed the recipe to a tee and am a little disappointed in the blueberries. Sally recommends rolling the blueberries in flour so they do not sink to the bottom of the cake. Well as you can see in the pictures my blueberries fell! Of course my mom says, "I could have told you they were still going to sink". She is just a baking know it all after 40 something years of baking. If you are looking for a work out then zest and squeeze the lemons for this cake! Squeezing lemons is hard work!!! My hands were hurting and my mom had a response for that too "you do have little hands". I must be doomed in the baking world if lemons are required with my little hands.
 
This cake made the father happy and that is all that matters! He did not have too much to say, probably did not want to get in trouble with my mom. You know he really likes it when he licks the front and back of the fork and says "this is good". My mom said "this is better than anything you can get in a bakery. I think you out did me on this one. You will have to make this ever year." If you have a cake lover in your life or you like lemons and blueberries, then make this cake.


Lemon Blueberry Layer Cake

Ingredients:

Cake

  • 1 cup (230g) unsalted butter, softened to room temperature
  • 1 and 1/4 cups (250g) granulated sugar
  • 1/2 cup (100g) light brown sugar
  • 4 large eggs, at room temperature
  • 1 Tablespoon vanilla extract
  • 3 cups (375g) all-purpose flour
  • 1 Tablespoon baking powder
  • 1/2 teaspoon salt
  • 1 cup (240ml) buttermilk
  • zest + juice of 3 medium lemons
  • 1 and 1/2 cups blueberries, fresh (258g) or non-thawed frozen (275g)
  • 1 Tablespoon all-purpose flour

Cream Cheese Frosting

  • 8 ounces (224g) full-fat cream cheese, softened to room temperature
  • 1/2 cup (115g) unsalted butter, softened to room temperature
  • 3 and 1/2 cups (420g) confectioners' sugar
  • 1 - 2 Tablespoons (15-30ml) heavy cream*
  • 1 teaspoon vanilla extract
  • pinch salt
Get Rich, Delicious Dessert Recipes

Directions:

Preheat the oven to 350F. Spray three 9x2 inch cake pans with nonstick spray. Set aside.
Make the cake. Using a handheld or stand mixer with a paddle attachment, beat the butter on high until creamy - about 1 minute. Add granulated and brown sugars and beat on medium-high speed until creamed, about 2-3 minutes. Scrape down the sides and bottom of the bowl as needed. Add eggs and vanilla. Beat on medium speed until everything is combined, about 2 full minutes. Scrape down the sides and bottom of the bowl as needed. Set aside.
In a large sized bowl, toss together the flour, baking powder, and salt. Slowly add the dry ingredients to the wet ingredients. Beat on low speed for 5 seconds, then add the milk, lemon zest, and lemon juice. Remove from the mixer and stir lightly until everything is just combined. Toss the blueberries in 1 Tablespoon of flour and fold into the batter. Batter is extremely thick. Do not overmix at any point. Overmixing will lend a tough, dense textured crumb.
Spoon batter evenly into 3 prepared cake pans. If only using 2 cake pans, your bake time will be longer. Bake the three layers for about 21-26 minutes or until a toothpick inserted in the center comes out clean. Mine took 21 minutes. Remove from the oven and allow to cool completely before frosting.
Make the frosting. Using a handheld or stand mixer with a paddle attachment, beat cream cheese and butter together on medium speed until no lumps remain, about 3 full minutes. Add confectioners' sugar, 1 Tablespoon cream, vanilla extract, and salt with the mixer running on low. Increase to high speed and beat for 3 minutes. Add 1 more Tablespoon of cream to thin out, if desired.
Assemble and frost. First, using a large serrated knife, trim the tops off the cake layers to create a flat surface. Place 1 layer on your cake stand. Evenly cover the top with cream cheese frosting. Top with 2nd layer, more frosting, then the third layer. Top with frosting and spread around the sides. The recipe doesn't make a ton of frosting, just enough for a light frost. Top with blueberries or lemon garnish if desired. Refrigerate for at least 45 minutes before cutting or else the cake may fall apart as you cut.
Make 1 day in advance if you'd like. Extras keep well in the refrigerator for up to 3days.


                                  Happy Father's Day!!!

Tuesday, January 14, 2014

Cranberry-Almond Muffins

I am still on a cranberry kick. I just cannot let go of the season even though it is over. Sadly the fresh cranberries have left the grocery store. I have been unable to locate frozen cranberries. Anyone know where I can find some? I suppose I should make a visit to Whole Foods to see what is in their freezers.. My cranberry obsession has been fueled by some of the blogs I follow and then left to my own devices I search the Internet. Not to mention I purchased a Cranberry Orange muffin at the Ingles bakery (Red Velvet is good too) and shared it with my mom. Yes, I'm an only child and wanted muffins of my very own.

 
I spotted this recipe on Whole Living. It was simple. The hardest part was zesting and juicing the orange. If you are not one of these New Year's resolution people who signed up for a gym membership, then this recipe will help build you upper body strength. Just kidding. Can you tell I am ready to get my gym back? Big class sizes make it difficult to workout. Anyway, back to the recipe. I substituted dried cranberries since fresh and frozen were not an option. I would imagine it would be better with fresh or frozen but dried cranberries did the trick too. The almond flour is lovely in this recipe and the extra almonds on top provide a nice crunch. I baked these on the night before the coldest day we have had in thirty years in the ATL. It was a great way to heat up my home and the smell was fabulous too!

Cranberry-Almond Muffins

  • Prep Time 20 minutes
  • Total Time 1 hour 20 minutes
  • Yield Makes 16

  • Ingredients

    • Vegetable oil cooking spray
    • 1 1/4 cups sugar
    • 1 cup whole-wheat flour
    • 3/4 cup all-purpose flour
    • 1/4 cup almond flour 
    • 1 teaspoon baking soda
    • Coarse salt
    • 2/3 cup nonfat milk
    • 2/3 cup plain low-fat yogurt
    • 2 large eggs
    • 1 orange, zested and juiced
    • 1 cup fresh or frozen cranberries
    • 1/2 cup sliced almonds

    Directions

    1. Preheat oven to 350 degrees. Line 16 cups of
      two 12-cup muffin tins with baking cups,
      and lightly coat each with cooking spray.
    2. Whisk together sugar, flours, baking soda,
      and 1/4 teaspoon salt in a large bowl. Whisk
      together milk, yogurt, eggs, and orange zest
      and juice in a medium bowl. Fold milk
      mixture into flour mixture, then gently fold
      in cranberries until combined.
    3. Spoon batter into baking cups until each
      is three-quarters full. Sprinkle with almonds.
      Bake until a toothpick inserted into the
      center of each comes out clean, about 20 minutes.
      Transfer pans to wire racks, and let
      cool for 10 minutes. Turn out muffins onto
      racks, and let cool completely.


    Monday, December 23, 2013

    Pumpkin Nutella Cupcakes

    Well I just had to share one more pumpkin recipe with you all before we can say pumpkin season is  over. How can it be? In my opinion pumpkin season is too short. Anyway sometimes I want a simple recipe and I love that the Nutella in this recipe is like frosting. Could it be any easier? To me pumpkin and Nutella are a wonderful combination. My coworkers tried to act like these were acceptable for breakfast and not just dessert. You be the judge.


    Pumpkin Nutella Cupcakes
    Makes 12-15 cupcakes
    • 1 15-oz. can pumpkin puree
    • 1/2 cup vegetable oil
    • 2 large eggs
    • 1 tablespoon pure vanilla
    • 1/4 cup light brown sugar, packed
    • 1/4 cup sugar
    • 2 cups all-purpose flour
    • 1 1/2 teaspoons ground cinnamon
    • 1/2 teaspoon ground ginger
    • 1/2 teaspoon nutmeg
    • 1 teaspoon baking powder
    • 1/2 teaspoon baking soda
    • 1/2 teaspoon salt
    • Nutella for topping
    Preheat oven to 350°F. Line a muffin pan with foil or paper liners.
    Place the pumpkin, oil, eggs, vanilla and brown sugar in a large bowl. Beat to combine.
    In a separate large bowl, whisk the flour, cinnamon, ginger, nutmeg, baking powder, baking soda and salt together. Add to wet ingredients and stir until just combined.
    Fill muffin cups around 3/4 full. Place a couple of teaspoons of Nutella on top of each cupcake. Use a toothpick to swirl the Nutella around the top of the batter.
    Bake 25-30 minutes or until a toothpick inserted in the middle comes out clean.

    Crustless Cranberry Pie

    My mom and I love cranberries so for her birthday this year (yes it took me over a month to post this) I searched for a new dessert. I found a recipe for crustless pie. Never really heard of crustless pie but I decided to go for it. And I'm so glad that I did. It was such an easy recipe and the taste is amazing. A little tart and sweet. Of course it turns out to be a beautiful explosion of red.


    Crustless Cranberry Pie

    Ingredients

     
    Original recipe makes 1 (9-inch) pie

    Directions

    1. Preheat oven to 350 degrees F (175 degrees C). Grease one 9 inch pie pan.
    2. Combine the flour, sugar, and salt. Stir in the cranberries and the walnuts, and toss to coat. Stir in the butter, beaten eggs, and almond extract. If you are using frozen cranberries, the mixture will be very thick. Spread the batter into the prepared pan.
    3. Bake at 350 degrees F (175 degrees C) for 40 minutes, or until a wooden pick inserted near the center comes out clean. Serve warm with whipped cream or ice cream.
     

    Tuesday, November 5, 2013

    White Bean Pumpkin Chili

    I know this is primarily a dessert blog but I had to share these recipes. Fall is my favorite season and this chili with cornbread made for an awesome fall lunch. I adjusted the chili recipe by cooking it over the stove instead of in a crock pot. It is chili so I let it simmer for about two hours after bringing all the ingredients to a boil. I was concerned the white northern beans may get too soft in the crock pot. I'm sure it is not an issue and is just my anxiety...I'm a baker and not the best with cooking.

    Crock Pot Turkey White Bean Pumpkin ChiliGina's Weight Watcher Recipes
    Servings: 9 • Serving Size: 1 cup • Old Points: 5 pts • Points+: 6 pts
    Calories: 272.5 • Fat: 2.5 g • Protein: 32 g • Carb: 31 g • Fiber: 12 g • Sugar: 2.4
    Sodium: 499 (without salt)

    Ingredients:

    • cooking spray (I used my Misto)
    • 2 lb 99% lean ground turkey
    • 1/2 tsp olive oil
    • 1 small onion, chopped
    • 3 garlic cloves, minced
    • 1 tsp chili powder, to taste
    • 2 bay leaves
    • 2 tsp cumin
    • 1 tsp oregano
    • 2 (15 oz cans) white northern or navy beans (I prefer Goya) rinsed and drained
    • 15 oz can pumpkin puree (not pumpkin pie filling)
    • 4.5 oz canned chopped green chile
    • 2 cups low sodium, fat free chicken broth
    • chopped cilantro and chives for topping
    • salt and pepper to taste
    • low fat sour cream for topping (optional)

    Directions:

    Heat a large heavy saute pan over high heat and lightly spray with oil. Add meat and cook, breaking it up until white, about 5 minutes. Add to crock pot.

    Add oil to the saute pan, then onions, garlic, sauté about 3 - 4 minutes; add cumin and sauté another minute.

    Add to crock pot. Add beans, pumpkin puree, green chilis, broth, chili powder, oregano, and bay leaves. Cover and cook on high for 4 hours or low for 8 hours.

    Remove bay leaves and adjust seasoning to taste before serving. Enjoy!


    Ingredients

     
    1 cup all-purpose flour
    1 cup polenta
    2 tablespoons sugar
    2 1/2 teaspoons baking powder 
    3/4 teaspoon salt
    2 eggs
    1 cup buttermilk
    About 1/4 cup cooled melted butter or margarine

    Preparation

    1. 1. In a bowl, mix flour, polenta, sugar, baking powder, and salt. In another bowl, beat eggs to blend with buttermilk and 1/4 cup butter; pour into flour mixture. Stir batter until evenly moistened.
    2. 2. Scrape batter into a buttered 8-inch square pan and spread level.
    3. 3. Bake in a 400° oven until cornbread is browned, springs back when lightly pressed in the center, and begins to pull from pan sides, 20 to 25 minutes. Use hot or cool.
                           Happy Fall!!!

    Raspberry and Cream Swirled Pumpkin Muffins

    I love raspberries and pumpkins. For the past few weeks raspberries have been on sale at Publix which is strange because it is November and I'm in full on pumpkin mode. So when I saw this recipe on the Picky Palate blog I knew I had to give it a try.


    It seems like an odd pairing but it actually tastes delicious. Just trust me on this one. I love raspberries so much that I used a whole pint instead of following the recipe and using a half of a cup.

    Raspberry and Cream Swirled Pumpkin Muffins

    Prep time: 15 min | Cook time: 30 min | Total time: 45 min

    Ingredients

  • 3/4 cup plain Greek 2% yogurt
  • 2 large eggs
  • 1 teaspoon pure vanilla extract
  • 1 cup pumpkin puree
  • 1/2 teaspoon ground cinnamon
  • 1 cup all purpose flour
  • 1 cup granulated sugar
  • 1 teaspoon baking soda
  • 1/4 teaspoon kosher salt
  • Raspberry Cream Cheese
    • 4 ounces softened cream cheese
    • 2 tablespoons granulated sugar
    • 1/2 cup Driscoll’s raspberries, rinsed and dried
    Directions
    1. Preheat oven to 350 degrees F. and line 18 cupcake cups with liners (foil liners recommended). If using paper liners, spray liners lightly with cooking spray before filling with batter.
    2. In a large mixing bowl, beat yogurt, eggs and vanilla until well combined. Stir in pumpkin and cinnamon. Slowly add flour, sugar, baking soda and salt, stirring until well combined. Fill liners 1/2 full with batter.
    3. To prepare raspberry cream cheese, beat softened cream cheese with sugar until well combined. Stir and smash raspberries into cream until combined and berries broken down. Place 1 teaspoon raspberry cream on top of filled cups. Take a toothpick or skewer and swirl cream throughout batter. Bake for 28-33 minutes, or until baked though. Remove and let cool. Serve room temperature or chilled.
    Makes 18 Servings

    UGA cupcakes


    I am a huge University of Georgia fan and an alumna. Some of you know we played our biggest rival over the weekend, the University of Florida. For a while now I have wanted to make super Gs from candy molds and I located a mold on Amazon. It is called a fan pan!!! Some what challenging to get chocolate in the small spaces but it was worth it.


    I baked chocolate cupcakes and iced them with cream cheese frosting. The red and black frosting is glitter gel by Wilton.

    They tasted amazing and the best part is Georgia beat Florida, 23-20. That is three years in a row now and we knocked Florida out of their chance of going to the SEC Championship game.


    You can't have a football party without chicken wings. The wings at American Deli are amazing. The right is lemon pepper and honey BBQ is on the left. Of course they look fabulous in the chip and dip I painted myself!


                          GO DAWGS!!!

    Tuesday, September 3, 2013

    Blueberry Pizza


    Blueberry pizza is my 50th blog post! I can't believe I have blogged about 50 recipes. Wow! I found this recipe on the How Sweet It Is blog and new I had to try it. I felt so bad for Jessica that after two failed attempts she was not able to sample this pizza at Cafe Sante. I am glad she created a recipe without ever eating the pizza. That is some skills! Or determination, however you look at it.
     
    I cheated and did not make my own dough but I included her recipe below. I'm a fan of the Italian dough that Publix sells. Just follow the directions on the bag of dough for proofing and cooking. A bag of dough does not sound appetizing but trust me it is good stuff.
     
    Ready for the oven!
                                     
    My mom and I made this pizza over Labor Day weekend. We were not sure how we would like it. It is seriously heaven! We love it! At first my mom was hesitant with all the steps but after she tasted the blueberry awesomeness she said it is a keeper. (Of course my dad was not a fan.)  Not too sure how well the shallots go with the other flavors. Next time we may leave the shallots off and add lemon juice to the ricotta spread.


    Blueberry Pizza with Whipped Ricotta + Caramelized Shallots

    Yield: 1 pizza
    Total Time: 2 hours

    Ingredients:

    dough
    1 1/8 cups warm water
    3 teaspoons active dry yeast
    1 tablespoon honey
    1 tablespoon olive oil
    2 2/3 cups whole wheat flour
    1 teaspoon salt
    1 tablespoon olive oil
    2 tablespoons butter
    4 shallots, sliced
    1/4 teaspoon salt
    2 tablespoons brown sugar
    2 garlic cloves, minced
    1/2 cup ricotta cheese
    2 lemons, zested
    8 ounces mozzrella cheese, freshly grated
    2 tablespoons fresh thyme
    1 cup blueberries
    2 tablespoons parmesan cheese

    Directions:

    In a large bowl, combine water, yeast, honey and olive oil. Mix with a spoon, then let sit until foamy, about 10 minutes. Add in 2 cups flour and salt, stirring with a spoon until the dough comes together but is still sticky. Using your hands, form the dough into a ball and work in the additional 2/3 cup flour, kneading it on a floured surface for a few minutes. Rub the same bowl with olive oil then place the dough inside, turning to coat. Cover with a towel and place in a warm place to rise for about 1-1 1/2 hours.
    While the dough is rising, heat a large skillet over low heat and add olive oil and butter. Add in the shallots and the salt and cover, cooking for 30 minutes and stirring occasionally and reducing the heat more if they begin to brown too much. Stir in the brown sugar and the garlic and cook for 5 more minutes. Set aside.
    Add the ricotta to a food processor and blend until smooth. Add in the lemon zest and puree until combined. After the dough has risen, punch it down and place it back on the floured surface. Using a rolling pin or your hands, form it into your desired shape (sometimes I use baking sheets and do rectangles or free form pizzas - this specific dough will yield one pizza large enough to feed about 3-4 people) and place on a baking sheet or pizza peel. Place the towel back over the dough and let sit in the warm place for 10 minutes.
    Preheat your oven to 375 degrees (or if you're using a pizza stone or the skillet method, follow those directions). Spread the ricotta on the dough and cover it with half of the mozzarella. Add the shallots and the thyme, then cover it in the blueberries. Add the remaining cheese. Bake for 30 to 35 minutes, or until the crust is golden and the cheese is bubbly. Remove and serve with parmesan on top.


    Good bye sweet summer time!!!


    Wednesday, August 21, 2013

    Paleo Chocolate Chip Cookies

    My friend recommended that I make these Paleo chocolate chip cookies. She said they were the best chocolate chips cookies she has ever had. We went to the Tucker Farmers Market the other week and when we found almond flour I knew I had to bake the cookies. Next step was tracking down coconut oil so I located some by LouAna at Wal-Mart. Yes, I said Wal-Mart...I know, I know. I rarely shop there okay?!? Then Ghiradelli was on sale at Target so I picked up a bar of the Sea Salt Soiree...woo hoo! I have been on a Farmers Market kick this summer and purchased local honey at the Statham Farmers Market a few weeks ago so I went with that for this recipe.

     
    The batter is very interesting. I did not know what to expect since this was my first time baking with almond flour. It smells delicious! I let my parents and a friend try these cookies. None of us like them. My dad went as far to say I wasted perfectly good chocolate. I assured him it was only a quarter cup so no big waste. I said I may take them in to work to share with my coworkers and mom said "You better not. You will mess up your baking reputation." A Southern girl never wants to tarnish her baking reputation..lol. You may ask why I decided to share this recipe if it was a total fail. Well, I decided we all have different tastes and someone, like my girlfriend, might enjoy them. At least I do not feel too guilty eating them. Oh and of course no one wanted any cookies to take home so yeah I get to eat the rest. To end on a positive note I purchased Maple Caramel Almond Butter from NaturAlmond at the Farmers Market and it is AMAZING!!! I may track down a recipe to bake something with the almond butter. Then again I may be selfish and enjoy it all by myself!


    Paleo Chocolate Chip Cookies 

    Prep time
     
    Cook time

    Total time

    Dairy, gluten and grain free chocolate chunk cookies that taste just like the real deal.
    Author:
    Recipe type: cookies
    Serves: 10 cookies

    Ingredients
    • 1 cup almond meal
    • ⅛ teaspoon salt
    • ⅛ teaspoon baking soda
    • 3 tablespoons melted coconut oil (*update: make sure to measure oil after melting so that you’re not inadvertently using too much. This can cause cookies to flatten)
    • 2 tablespoons honey
    • 1 teaspoon vanilla extract
    • 1 tablespoon almond milk
    • ¼ cup chopped dark chocolate pieces
     
    Instructions
    1. Preheat oven to 350 degrees and line a baking sheet with parchment paper or a silpat.
    2. Combine dry ingredients in a medium bowl.
    3. Whisk together wet ingredients in a small bowl.
    4. Add wet to dry and mix together.
    5. Fill a tablespoon measure with batter and press down to form a half-circle. Tap batter out onto baking sheet and lightly press down in the center.
    6. Bake for 10-11 minutes until bottoms just start to turn brown.
    7. Remove from oven and let cool 2-3 minutes before transferring to a wire rack. They will be soft when removed from oven but firm up in a couple of minutes.


    Spiced Peach Muffins

    This may be hard for ya'll to believe but this is the first year that I've been crazy about peaches. I was born and raised in Georgia so I know it is shocking. It started last year after I had a Monte Cristo sandwich with peach jelly at Duck's Cosmic Kitchen with a side of some amazing peach salad concoction. Then this year my mom made her 2nd annual blueberry-peach galette. Yum! A couple of weeks ago I bought some peaches at the Tucker Farmers Market and enjoyed eating them all by themselves. Georgia peaches are so sweet and juicy! Apparently the trick to getting them soft is to leave them in a paper bag on the counter. Wow I learn something new everyday. Any who, I came across this muffin recipe and decided to bake it up.

     
    The muffin is a little taste of summer with a dash of fall. I did not have allspice so I substituted pumpkin pie spice. Some of you may find this strange but I love pumpkins so I was pleased with the outcome. I will suggest that you use the biggest mixing bowl you own because it is a lot of batter and a mound of peaches. Also, I was able to get 23 muffins. I had too much for 16 muffins and not enough for 24 heaping muffins. Always a bummer when that happens. So some are small and some are gigantic. Nothing wrong with that I guess.


    Spiced Peach Muffins

    Makes 16 muffins.

    4 1/2 cups Unbleached All-Purpose Flour
    1 teaspoon salt
    4 1/2 teaspoons baking powder
    2 cups dark brown sugar
    1/2 teaspoon ground allspice
    1/2 teaspoon ground nutmeg
    1 teaspoon ground cinnamon
    2 eggs
    3/4 cup vegetable oil
    1 1/4 cups milk
    4 peaches, diced (not peeled)
    granulated sugar

    1. Preheat oven to 400ºF. Grease a 16 cup muffin tin, set aside.

    2. In a large bowl combine flour, salt, baking powder, brown sugar, allspice, nutmeg and cinnamon. Stir in eggs, vegetable oil and milk, then gently stir in fruit.

    3. Heap the batter into cups; they’ll be very full. Sprinkle with granulated sugar. Bake for 25 to 30 minutes, or until muffins test done.

    Tuesday, July 30, 2013

    Biscones

    Last fall during a trip to Savannah, GA I checked out Back in the Day bakery. I learned about this bakery and one of owners, Cheryl Day, while watching a couple of episodes of Paula Deen on the food network. Before leaving I read up on the bakery and knew I had to go. My mom and I loved it! The cupcakes were to die for and the bakery had this adorable vintage motif. Of course we bought the cookbook! Mom has made the old fashioned cupcakes a few times. In an effort to bake with blueberries I decided to try out the biscones. At first I was not quite sure what a biscone is but I know I like biscuits and scones so why not combine them???

     
    It is a one bowl recipe that could not be easier. Then you just scoop them on a baking sheet lined with parchment paper - no rolling - no shaping!!! I baked them for 23 minutes which was too long because some of the bottoms browned. When I checked them though at 20 minutes they still looked gooey. Nope, apparently that is  the texture because they looked the same 3 minutes later.  Not quite golden brown like the recipe says but fully baked. Baking times will vary so word to the wise do not expect the biscones to be as dry as a biscuit nor a scone.

    The cookbook gives you the option to make buttermilk biscones or add blueberries and whip up a lemon glaze. Blueberries and lemon please! There is probably half a gallon still in my freezer from picking earlier this month. It takes a couple of bites before your brain can process what you are eating. I had a hard time placing the yummy sweet taste. The recipe calls for cardamom but I opted to substitute with equal parts cinnamon and nutmeg. I think this may have been the sweet deliciousness. My dad liked these which is saying a lot because he is not big on some pastries...umm like scones.


    Ingredients

     
    1 1/2 cups unbleached all-purpose flour

    1 1/2 cups cake flour (not self-rising)

    1/4 cup granulated sugar

    2 tablespoons baking powder

    Salt

    1/4 teaspoon ground cardamom

    1/2 pound (2 sticks) cold unsalted butter, cut into 1/2-inch pieces

    1/2 cup fresh or frozen blueberries

    1 1/2 cups buttermilk, plus more as needed

    1 large egg

    3/4 cup confectioners' sugar

    Zest and juice of 1 lemon
     

    Directions

     
    1. Preheat the oven to 375° and line two baking sheets with parchment paper.

    2. In a large mixing bowl, whisk the all-purpose flour with the cake flour, granulated sugar, baking powder, 3/4 teaspoon of the salt and cardamom until combined. Using a pastry cutter or two knives, work in the butter until you have various-size pieces ranging from sandy patches to pea-size chunks and some larger bits as well. Gently stir in the blueberries.

    3. Gradually pour in the buttermilk and gently fold the mixture until there are no bits of flour remaining in the bottom of the bowl. If the dough seems dry, add a little more buttermilk until it is moist and slightly sticky.

    4. Using your hands, gently pat down the dough until it resembles a loaf of bread. Using a large ice-cream scoop, scoop mounds of the dough onto the prepared baking sheets, arranging them about 1 inch apart. Lightly tap down the tops of the biscones with the scoop.

    5. In a small bowl, lightly beat the egg with a pinch of salt. Brush the tops of the biscones liberally with the egg wash. Bake for 20 to 25 minutes, rotating the baking sheets halfway through, until the biscones are golden and fully baked. Remove from the oven and let cool for 10 minutes.

    6. Meanwhile, in a small bowl, whisk the confectioners' sugar with the grated lemon zest and juice until smooth and creamy. Drizzle over the biscones and serve immediately.
     

    Put some SOUTH in your mouth y'all!!!!!!


    Wednesday, July 17, 2013

    Roasted Blueberry Cupcakes


    Happy National Blueberry Month!!! (Now you all know that July is National blueberry month..in case you did't already.) I picked blueberries at Washington Farms over the July 4th weekend. Not quite sure why my mom and I enjoy this so much but we do. This year we decided to go early in the morning so we would have a chance to pick blackberries too. It was my first time picking blackberries and man was it fun. I'm undecided about baking anything with blackberries. Right now I'm loving them with yogurt, granola, and some honey.


    Back to the blueberries and recipe at hand. These recipes on the Bean Town Baker blog popped up before I went blueberry picking and I made a mental note that I had to see these beautifully purple cupcakes for myself. Wow! The color is amazing!

    I was a little apprehensive about roasting blueberries in fear that my oven would be a mess. I placed the cute little guys on some aluminum foil and it was an easy clean up. Easy as in crinkle up the foil and throw it away! No harm done to the cookie sheet or oven. It was lots of fun watching the creamy batter turn purple. Now I will say that the bottom of my cupcake wells are slightly purple. I baked the cupcakes in purple liners but I have used these Wilton liners before in red with no problem. Still scratching my head on this one. My attempt at this recipe yielded 15 cupcakes. I'm sure I could have produced one more..oh well.


    The only change I made to the recipe was that I substituted almond extract for vanilla. Totally forgot to pick up vanilla extract at the grocery store. Whoops!

    This cream cheese frosting recipe is to die for! Very sweet!!! (And it was enough to frost all 15 cupcakes with a little extra left for sampling.) My friend asked if there was extra frosting because she wanted to eat the frosting by itself. Silly girl...no leftovers...I took care of that. The girls in my small group noted that the cupcake is heavy and cake like. I agree with them that the consistency is like no other cupcake I have baked before. Must be that roasted blueberry goodness. Only had a few takers during small group so I brought the rest in to work. A coworker e-mailed me to say the cupcake is delicious. This made me think of Julia Child, "It's delicious!" On that note, do not feel like you have to go all out and pick fresh blueberries. Store bought berries will be just fine and then you too can watch the magical transformation into PURPLE batter and cupcakes.

    Roasted Blueberry Cupcakes with Cream Cheese Frosting

    Roasted blueberries have a strong sweet flavor that comes through perfectly in these cupcakes
    Yield: 16 cupcakes

    Ingredients:

    1 1/2 cups fresh blueberries
    1 cup sugar
    1/2 cup butter
    2 eggs
    2 tsp vanilla
    1 3/4 cups flour
    1 1/4 tsp baking powder
    1/4 tsp salt
    2-3 Tbsp milk
    1 batch Cream Cheese Frosting

    Directions:

    Preheat oven to 350 degrees F.
    Spread blueberries on a baking sheet (with sides) and roast for 10-15 minutes, or until berries start to burst. Remove from oven and let cool.
    Beat butter and sugar together in the bowl of an electric mixer until fluffy, about 4-5 minutes.
    Add eggs and vanilla and mix until combined, another 2-3 minutes.
    Add flour, baking powder and salt with the mixer on low speed, then gradually increase speed.
    Scrape in blueberries and beat on medium speed until the berries break down – about 2-3 minutes. At this point, the berries most likely have enough liquid that you only need to add a small amount of milk to the batter.
    Begin adding 1 tablespoon of milk at a time and beat with the mixer until the batter is smooth. You definitely want it to be cake batter and not dough. (My batter took 2 Tbsp of milk)
    Pour into cupcake liners, filling 2/3 of the way full, and bake for 18-22 minutes or until cake is set. Let cool completely, then frost.
     

    Cream Cheese Frosting

    Yield: 1 cup (enough to frost 12 cupcakes)

    Ingredients:

    4 oz cream cheese at room temp
    1/2 stick (4 Tbsp) butter at room temp
    1/2 Tbsp vanilla
    1 1/2-2 cups powdered sugar

    Directions:

    Place the cream cheese in the bowl of your mixer. Beat on medium-high until completely smooth, 3-4 minutes. Add the butter and continue to cream until fluffy.
    Add vanilla extract. Slowly add powdered sugar (1/4 cup at a time) until desired consistency is reached.


    Monday, July 8, 2013

    Tie Dye Cake


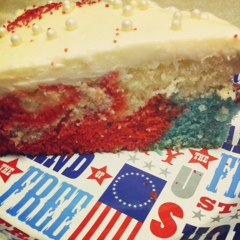
    When contemplating what to make for July 4th I came across this tie dye cake. All the berry desserts are great but I LOVE cake! The cake was simple to make and it tasted very sweet!

    It was a joint colaboration with my mom. She mixed up the cake and dyed part of the batter red. I dyed another portion of the batter blue, mixed up the icing, and decorated the cake with white sugar pearls and red sugar. Always more fun when you have someone to bake with. We considered slicing the cake in half as Sally of Sally's Baking Addiction offered as a suggestion. I mean who in my family refuses more frosting?!? The cake started to crack a little in the middle while cooling (we may have taken it out of the pan too soon - we are eager eaters). Thus we went with the single layer and boy were we glad. The frosting is sooooo rich! My mom has added this recipe to her official cake line up. Anyone else have a cake line up or a few go to recipes? We also love Back in the Day's recipe.


    I hope everyone had a fabulous 4th of July! We did despite the rain. Cake makes everything better. You should consider making this for your next festive get together or even plain ole' vanilla will be just wonderful!
     
    How to Make a Tie-Dye Cake
    Serves 10. Cake stays fresh covered at room temperature or in the refrigerator for 5 days.
     
    Ingredients
    Instructions
    1. Preheat oven to 350F degrees. Spray 9x2 inch round cake pan (or 9-inch springform pan) with nonstick spray.
    2. Make the cake batter according to my directions (see link in the ingredient list). Divide the white batter into three separate bowls. Grab your food coloring and dye your batters any color you choose. I used 10 drops of red, 10 drops of blue, and left the third bowl plain. Place a separate spoon in each bowl. Scoop large spoonfuls of each batter and layer them into prepared baking pan. It does not have to be pretty. The colors will create a tie-dye effect. See photo above for how my cake looked prior to baking.
    3. Bake for 20 minutes. Cover loosely with aluminum foil (loosely to avoid the top from sticking to the foil). Bake for 13-17 more minutes or until a toothpick inserted in the center comes out clean. Allow to cool.
    4. Make the frosting according to my directions (see link for frosting in ingredient list). Frost cooled cake and decorate as desired.
    Notes
    Interested in making a layer cake? You could: (1) Bake the cake as indicated and slice the cake horizontally to create two layers. Double the frosting if desired. (2) Double the cake recipe and bake in two separate 9-inch cake pans for 1 extra tall layer cake. Double the frosting recipe as well.


    Wednesday, June 12, 2013

    Dark Chocolate Cupcakes with Mascarpone Frosting

    It has been a long time since I've posted a cupcake recipe...so sorry. Of course I made cupcakes for Mother's Day...amaretto actually..but I failed to take a picture.

    I had half a container of mascarpone cheese that needed a home and I stumbled upon a new blog....well new to me..a cup of mascarpone. Such a cute name for a blog! May be a bit biased because I love mascarpone. The recipe calls for special dark cocoa and I was not too sure I had seen this in the grocery store. I asked my mom and she said "Oh that is right next to the regular cocoa." Of course mom always knows these things. Sure enough "regular" cocoa was sitting beside the special dark cocoa. I guess they are supermarket buddies...haha.


    If you are a one bowl baker, then this recipe is for you. It could not have been easier. Dump all the ingredients into the mixer and let that bad boy (Kitchen Aid mixer) do it's thing. Special dark cocoa really makes for a beautiful dark chocolate color. I'm regretting not snapping a picture. Carol was right, the batter is very thin. I still used an ice cream scoop and was prepared for a mess.

    A while back I purchased white cupcake liners by Wilton and I will not do that again. The liners are too big for my cupcake pan so they fold and then there are creases in the cupcakes. Also, it makes it hard to tell how much batter is in the well so some cupcakes came out too big. Does anyone ever really complain about a cupcake that is too big? I mean really that is just more room for icing, right?

    The mascarpone frosting with more special dark cocoa is to die for....okay dramatic. I mean butter and mascarpone in one bowl....oh yeah! For some reason my frosting has a different color than Carol's and the consistency does not look as smooth. Oh well it still tastes wonderful and was approved by my small group and coworkers.

    I like how Carol ends her blog posts...Mangia! xox...adorable. So with that Mangia!

     
    Dark Chocolate Cupcakes with Chocolate Mascarpone Buttercream
                           Makes approximately 30 cupcakes
    Ingredients:
     
    for the cupcakes:
    2 cups sugar
    1-3/4 cups all-purpose flour
    3/4 cup Hershey's "Special Dark" Cocoa
    1-1/2 teaspoons baking powder
    1-1/2 teaspoons baking soda
    1 teaspoon salt
    2 eggs
    1 cup milk
    1/2 cup canola oil
    2 teaspoons vanilla extract
    1 cup boiling water or 1 cup hot brewed coffee
    for the mascarpone buttercream:
    4 ounces (1/2 of an 8 ounce tub) mascarpone cheese
    1/2 cup butter, softened
    1/3 cup Hershey's "Special Dark" Cocoa
    2 tablespoons milk
    2 teaspoons vanilla
    1 16 ounce box powdered sugar, sifted
     
    Create the cupcakes and buttercream:
     
    make the cupcakes:
    Heat oven to 350 degrees F. Line muffin pans (2-1/2" in diameter) with paper baking cups. Set aside.
     
    Stir together sugar, flour, cocoa, baking powder, baking soda and salt in large bowl. Add eggs, milk, oil and vanilla; beat on medium speed of hand mixer for 2 minutes. Stir in boiling water or hot coffee (batter will be thin).
    Fill cups 2/3 full with batter. Bake 22 - 25 minutes. Place on wire racks and remove from the pans as soon as they're able to be touched without burning yourself. Cool completely on wire racks before frosting. (I only bake one pan at a time and turn the pan half way through the baking cycle.)
    make the mascarpone buttercream:
    In a large mixing bowl, beat the mascarpone cheese, butter, cocoa powder, milk and vanilla with an electric stand mixer on medium to high speed until creamy. Gradually add powdered sugar, beating until smooth. Beat in enough additional milk (only if needed), 1 teaspoon at a time, to reach consistency needed for cupcakes. Makes 3 cups.